
gwooden_코린이
java_스레드_221206(12일차) 본문
스레드 - 다중처리
순차적으로 처리하는게 아닌 한번에 동시 처리
3가지 방법 존재
1. 클래스를 추가적으로 만들어서 스레드 상속을 받아 Main에서 불러와 작업
2. 익명 구현 객체를 사용
3. 람다식 활용
1. 스레드 상속을 활용한 스레드 작업
package 쓰레드;

public class Sample01 {

	public static void main(String[] args) {

		ThreadExtend t1 = new ThreadExtend();

		Runnable r = new RunnableImple();
		Thread t2 = new Thread(r);

		//쓰레드 실행은 .start 메서드로 실행
		t1.start();
		t2.start();

	}

}
▶ 결과값
Thread 상속
Thread : 0
Thread : 1
Thread : 2
Thread : 3
Thread : 4
Thread : 5
Thread : 6
Thread : 7
Thread : 8
Runnable 구현
Runnable : 0
Runnable : 1
Runnable : 2
Runnable : 3
Runnable : 4
Runnable : 5
Runnable : 6
Runnable : 7
Runnable : 8
Runnable : 9
Runnable : 10
Runnable : 11
Runnable : 12
Runnable : 13
Runnable : 14
Runnable : 15
Runnable : 16
Runnable : 17
Runnable : 18
Runnable : 19
Runnable : 20
Runnable : 21
Runnable : 22
Runnable : 23
Runnable : 24
Runnable : 25
Runnable : 26
Runnable : 27
Runnable : 28
Runnable : 29
Runnable : 30
Runnable : 31
Runnable : 32
Runnable : 33
Runnable : 34
Runnable : 35
Runnable : 36
Runnable : 37
Runnable : 38
Runnable : 39
Runnable : 40
Runnable : 41
Runnable : 42
Runnable : 43
Runnable : 44
Runnable : 45
Runnable : 46
Runnable : 47
Runnable : 48
Runnable : 49
Thread : 9
Thread : 10
Thread : 11
Thread : 12
Thread : 13
Thread : 14
Thread : 15
Thread : 16
Thread : 17
Thread : 18
Thread : 19
Thread : 20
Thread : 21
Thread : 22
Thread : 23
Thread : 24
Thread : 25
Thread : 26
Thread : 27
Thread : 28
Thread : 29
Thread : 30
Thread : 31
Thread : 32
Thread : 33
Thread : 34
Thread : 35
Thread : 36
Thread : 37
Thread : 38
Thread : 39
Thread : 40
Thread : 41
Thread : 42
Thread : 43
Thread : 44
Thread : 45
Thread : 46
Thread : 47
Thread : 48
Thread : 49
package 쓰레드;

//Runnable 인터페이스 상속
public class RunnableImple implements Runnable{

	public void run() {
		System.out.println("Runnable 구현");
		for(int i = 0; i<50; i++) {
			System.out.println("Runnable : " + i);
		}
	}

}
package 쓰레드;
//extends Thread 클래스 쓰레드 상속
public class ThreadExtend extends Thread{
//쓰레드 내부에 run 메서드 존재
public void run() {
System.out.println("Thread 상속");
for(int i = 0; i<50; i++) {
System.out.println("Thread : " + i);
}
}
}2. 익명 구현 객체를 이용한 스레드
package 쓰레드;

public class Sample02 {

	public static void main(String[] args) {

		//익명 구현 객체
		Thread t1 = new Thread(new Runnable() {
			public void run() {
				System.out.println("t1스레드");
				for(int i = 0; i<50; i++) {
					System.out.println("t1 : " + i);
				}
			}
		});

		Runnable r = new Runnable() {
			public void run() {
				System.out.println("t2스레드");
				for(int i = 0; i<50; i++) {
					System.out.println("t2 : " + i);
				}
			}
		};

		Thread t2 = new Thread(r);

		t1.start();
		t2.start();

	}

}
3. 람다식을 활용한 스레드
package 쓰레드;

public class Sample03 {

	public static void main(String[] args) {


		Thread t1 = new Thread(() -> {
			System.out.println("t1 스레드");
			for(int i = 0; i<50; i++) {
				System.out.println("t1 : " + i);
			}

		});

		//람다식 활용
	//인터페이스 변수 = 매개변수 -> 람다식 {
		Runnable r = () -> {
			System.out.println("t2 스레드");
			for(int i = 0; i<50; i++) {
				System.out.println("t1 : " + i);
			}
		};

		Thread t2 = new Thread(r);


		t1.start();
		t2.start();


	}

}
4. 우선순위 설정
우선순위는 숫자로 표기가 좋다.
운영체제에 따라서 최대 값이 10이 없는 경우도 존재해서 일반적으로 숫자로 표기하여 우선순위를 정해주는게 좋다
		//기본 세팅 값이 5로 되어있어 5를 기준으로 실행한다
		t1.setPriority(10);
		t2.setPriority(1);
숫자가 큰게 먼저 실행되게 우선순위를 정해준다
		t1.setPriority(Thread.MAX_PRIORITY);
		t2.setPriority(Thread.MIN_PRIORITY);
스레드 안에 있는 상수를 불러와 처리도 가능
.MAX_PRIORITY는 값이 10
.MIN_PRIORITY은 1
Thread.NORM_PRIORITY;.NORM_PRIORITY; 은 기본 값이 5로 고정
| 순환 할당 (round-robin) 방식 JVM(자바 가상 머신) <-- 따로 설정을 건드릴수 없으며 가상머신이 PC사양에 맞춰 알아서 작동 |
5. 상태제어 (try / catch / sleep)
스레드에서 sleep은 잠시 대기 해주는 기능
sleep 자체가 tryCatch를 강요
스레드 외부 부분에서 강제 종료 처리할때는 예외처리가 발생 할 수 있어 tryCatch 사용
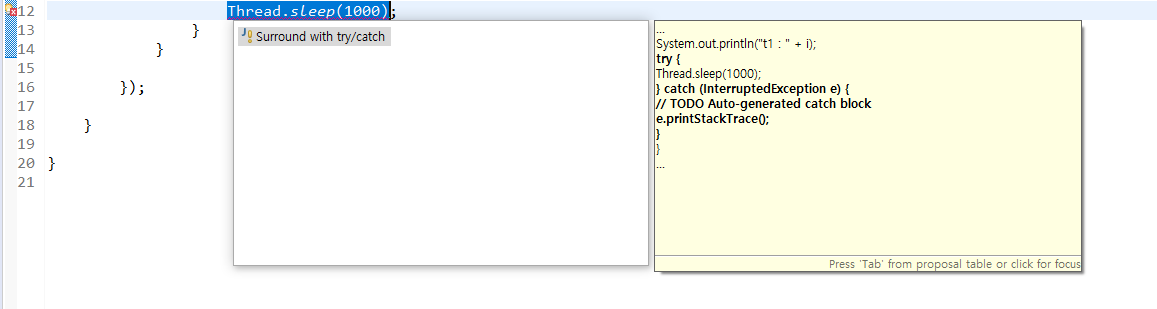
try {
						Thread.sleep(1000);
					} catch (InterruptedException e) {
						// TODO Auto-generated catch block
						e.printStackTrace();
					}
package 쓰레드;
public class Sample04 {
public static void main(String[] args) {
Thread t1 = new Thread(new Runnable() {
public void run() {
for(int i = 0; i<10; i++) {
System.out.println("t1 : " + i);
try {
Thread.sleep(1000);
} catch (InterruptedException e) {
e.printStackTrace();
}
}
}
});
t1.start();
}
} Thread t1 = new Thread(new Runnable() {
public void run() {
for(int i = 0; i<10; i++) {
try {
Thread.sleep(1000);
} catch (InterruptedException e) {
e.printStackTrace();
}
System.out.println("t1 : " + i);
}
}
});
t1
System.out.println("t1 : " + i); 위치에 따라 출력되는 값이 바로 나오지 않게도 설정 가능
package 쓰레드;

public class Sample05 {

	public static void main(String[] args) {

		Thread t1 = new Thread(new Runnable() {

			@Override
			public void run() {
				try {
					int i = 1;
					while(true) {
						System.out.println("t1 : " + i);
						Thread.sleep(1000);
						i++;
					}
				} catch(InterruptedException e) {

				} //finally <-- 무조건 실행시키고 싶은게 있을 때

				System.out.println("스레드 종료");

			}
		}); /** 스레드 종료 시점 */

		t1.start();

		try {
			Thread.sleep(10000);
		} catch (Exception e) {

		}

		t1.interrupt(); //.interrupt 강제로 예외 발생 시켜주는 메서드
						//강제로 예외 발생 시켜서 종료 시켜준다.
						//정지 중인 상태에 대한 스레드만 강제로 예외 발생해준다.
						//sleep이랑 같이 사용

	}

}
.interrupt 강제로 예외 발생 시켜주는 메서드
강제로 예외 발생 시켜서 종료 시켜준다.
정지 중인 상태에 대한 스레드만 강제로 예외 발생해준다.
sleep이랑 같이 사용
finally <-- 무조건 실행시키고 싶은게 있을 때
6. .join();
package 쓰레드;

public class Sample06 {

	public static void main(String[] args) {

		Sum t1 = new Sum();
		Sum t2 = new Sum();

		t1.start();
		t2.start();

		try {
			t1.join(); //.join 메서드로 위 t1에 반복이 끝날떄 가지 기다려준다.
			t2.join();
		} catch(Exception e) {

		}

		System.out.println(t1.sum + t2.sum);


	}

}
package 쓰레드;

public class Sum extends Thread {

	int sum = 0;

	public void run() {
		for(int i = 1; i<=100; i++) {
			sum += i;
		}
	}

}
7. Thread.yield();
양보해서 다른 스레드를 먼저 실행 시켜준다.
무한 루프문 안에 위치
package 쓰레드;

public class Sample07 {

	public static void main(String[] args) {

		Yt t1 = new Yt();
		Yt t2 = new Yt();

		t1.start();
		t2.start();

		try {
			Thread.sleep(5000);
		} catch(Exception e) {

		}

		t1.isContinue = false;


		try {
			Thread.sleep(5000);
		} catch(Exception e) {

		}

		t1.isContinue = true;

		try {
			Thread.sleep(2000);
		} catch(Exception e) {

		}

		t1.isBraek = true;
		t2.isBraek = true;

	}

}
package 쓰레드;
public class Yt extends Thread{
boolean isBraek = false;
boolean isContinue = true;
public void run() {
while(!isBraek) {
if(isContinue) {
try {
Thread.sleep(1000);
} catch (Exception e) {
}
System.out.println(getName() + "실행 중");
} else {
Thread.yield(); //양보해서 다른 스레드를 먼저 실행 시켜준다.
//무한 반복문 안에 위치
}
}
System.out.println(getName() + "종료");
}
}8. synchronized <-- 동기화 시켜주는 기능
동기화 synchronized - 공유 자원을 쓸때만 Main에서 생성해준 객체가 1개일때
한번에 한개 스레드만 공유 자원에 접근 하도록 잠금 상태로 바꿔준다.
다른 스레드는 진행중인 작업을 간섭 못함
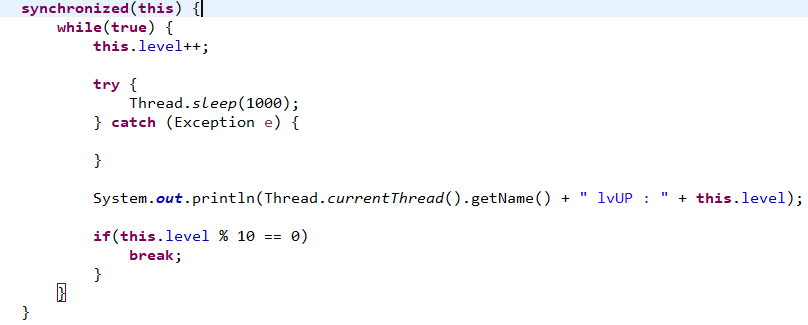
| public synchronized void 메서드이름() { -> 해당 메서드 내부에 있는 것만 <- (동기화 메서드) 한개 스레드만 실행 } |
| public void 메서드이름() { 여러 스레드 실행 가능 synchronized (공유 객체) { -> 해당 블록 내부에 있는 것만 <- (동기화 블록) 한개 스레드만 실행 } 여러 스레드 실행 가능 } |
package 쓰레드;

public class GameMain {

	public static void main(String[] args) {


		SmartPhoneGame game = new SmartPhoneGame();
		// p1과 p2를 객체 하나에 같이 사용하게 되어 증가가 1씩 되어야 되는데
		// p1 +1, p2 +2 가 하나의 객체에서 처리되면 = 2 가 되어버린다.
		// 동기화를 따로 시켜주면 해결

		Player01 p1 = new Player01();
		p1.setGame(game);

		Player02 p2 = new Player02();
		p2.setGame(game);


		p1.start();
		p2.start();


	}

}
package 쓰레드;
public class Player02 extends Thread{
private SmartPhoneGame game;
public void setGame(SmartPhoneGame game) {
this.setName("Player2");
this.game = game;
}
public void run() {
game.increaseLevel();
}
}package 쓰레드;
public class Player01 extends Thread {
private SmartPhoneGame game;
public void setGame(SmartPhoneGame game) {
this.setName("Player1");
//.setName은 상속받은 Thread를 가리켜서 Thread에 이름을 "Player1로 설정해준다.
this.game = game;
}
public void run() {
game.increaseLevel();
}
}package 쓰레드;
public class SmartPhoneGame {
private int level;
public int getLevel() {
return level;
}
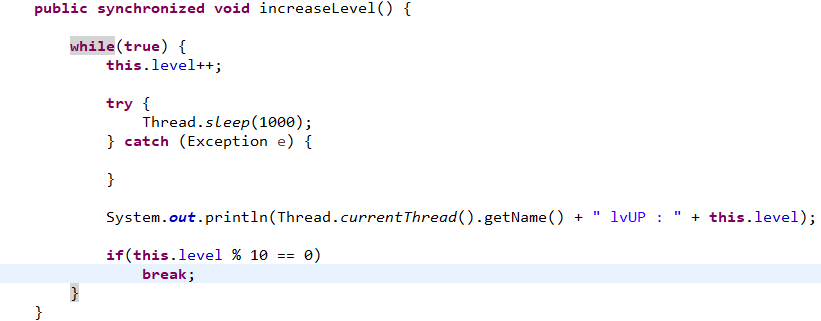
//synchronized <-- 동기화 시켜주는 기능
public synchronized void increaseLevel() {
while(true) {
this.level++;
try {
Thread.sleep(1000);
} catch (Exception e) {
}
System.out.println(Thread.currentThread().getName() + " lvUP : " + this.level);
if(this.level % 10 == 0)
break;
}
}
}스레드간 협업
wait() : 실행중인 스레드 대기
notify() : 대기 중인 스레드를 실행 -> 선택 불가능
notifyAll() : 모든 대기 중인 스레드를 실행
package 쓰레드;

public class SmartPhoneGame {

	private int level;

	public int getLevel() {
		return level;
	}

	//synchronized <-- 동기화 시켜주는 기능
	public synchronized void increaseLevel() {

		while(true) {
			this.level++;

			try {
				Thread.sleep(1000);
			} catch (Exception e) {

			}

			System.out.println(Thread.currentThread().getName() + " lvUP : " + this.level);

			if(this.level == 5) {
				notifyAll();
				try {
					wait(); //wait은 try, catch 랑 같이 사용 해야됨
				} catch (Exception e) {

				}
			}

			if(this.level % 10 == 0)
				break;
		}
	}

}
package 쓰레드;
public class Sample08 {
public static void main(String[] args) {
WorkObject wo = new WorkObject();
ThreadA threadA = new ThreadA(wo);
ThreadB threadB = new ThreadB(wo);
threadA.start();
threadB.start();
}
}package 쓰레드;
public class ThreadB extends Thread{
private WorkObject workobject;
public ThreadB(WorkObject workobject) {
this.workobject = workobject;
}
public void run() {
for(int i = 0; i<10; i++) {
workobject.methodB();
}
}
}package 쓰레드;
public class ThreadA extends Thread{
private WorkObject workobject;
public ThreadA(WorkObject workobject) {
this.workobject = workobject;
}
public void run() {
for(int i = 0; i<10; i++) {
workobject.methodA();
}
}
}package 쓰레드;
public class WorkObject {
//동기화 블록
public synchronized void methodA() {
System.out.println("methodA 실행");
notify();
try {
wait();
} catch (Exception e) {
}
}
public synchronized void methodB() {
System.out.println("methodB 실행");
notify();
try {
wait();
} catch (Exception e) {
}
}
}package 쓰레드;
public class Sample09 {
public static void main(String[] args) throws InterruptedException {
RunThread t = new RunThread();
t.start();
Thread.sleep(3000);
t.stop = true;
//아래 try / catch로도 사용 가능하고
//메인문에 throws InterruptedException로 예외처리도 가능하다.
/*
try {
Thread.sleep(3000);
} catch (InterruptedException e) {
}
*/
}
}package 쓰레드;
public class RunThread extends Thread {
boolean stop; //스레드를 실행시키는 스위치 같은 역할을 하기 위해 변수선언
public void run() {
while(!stop) {
System.out.println("스레드 실행중");
}
System.out.println("종료");
}
}- 공용객체
package 스레드2;

public class Main {

	public static void main(String[] args) {

		Accont acc = new Accont();
		parent p = new parent(acc);
		Child c = new Child(acc);

		p.start();
		c.start();

	}

}
package 스레드2;
public class Child extends Thread{
Accont accont;
public Child(Accont accont) {
super("자식"); //스레드 이름 설정
this.accont = accont;
}
public void run() {
while(true) {
try {
if(accont.money > 0) {
accont.withdraw(); //만약 true면
}
sleep(1000);
} catch(Exception e) {
}
}
}
}package 스레드2;
public class parent extends Thread{
Accont accont;
public parent(Accont accont) {
super("부모"); //스레드 이름 설정
this.accont = accont;
}
public void run() {
while(true) {
try {
accont.deposit();
sleep(2000); //Thread.sleep(2000);이랑 같은 코드
} catch(Exception e) {
}
}
}
}package 스레드2;
public class Accont {
//본인 통장
//부모님이 용돈을 보냄 + (sleep 이용)
//내 통장에서 돈을 빼서 씀 -
//통장 잔고 0원
int money;
/** 출금에 관련된 메서드 */
synchronized void withdraw() {
while(money == 0) { //금액이 0과 동일할때
try {
wait(); //맞으면 정지
} catch (Exception e) {
}
}
notifyAll();
System.out.println(Thread.currentThread().getName() + money + "원 출금");
money = 0;
}
/** 입금에 관련된 메서드 */
synchronized void deposit() {
while(money > 0) { //잔고가 있을때 0 보다 크냐?
try {
wait(); //맞으면 정지
} catch (Exception e) {
}
}
notifyAll();
money = (int)(Math.random()*5) + 1; //1 ~ 5까지 랜덤 수만 나오게
money = money * 10000;
System.out.println(Thread.currentThread().getName() + money + "원 입금");
}
}9. 데몬 스레드
스레드를 보조 기능
일반 스레드가 종료 -> 데몬 스레드도 종료
package 데몬스레드;

public class Sample01 {

	public static void main(String[] args) {

		Demon t1 = new Demon();
		Demon t2 = new Demon();

		t1.setDaemon(true);
		t2.setDaemon(true);

		t1.start();
		t2.start();

		try {
			Thread.sleep(5000);
		} catch(Exception e) {

		}

		System.out.println("main 종료");

	}

}
package 데몬스레드;
public class Demon extends Thread{
public void run() {
while(true) {
System.out.println(getName());
try {
sleep(500);
} catch(Exception e) {
}
}
}
}◆ AutoSave 만들어보기
package 데몬스레드;

public class Sample02 {

	public static void main(String[] args) {

		AutoSave as = new AutoSave();

		as.setDaemon(true);

		as.start();

		System.out.println("문서작성 시작");

		try {
			Thread.sleep(5000);
		} catch(Exception e) {

		}

		System.out.println("문서작성 종료");

	}

}
package 데몬스레드;
public class AutoSave extends Thread {
public void save() {
System.out.println("자동 저장");
}
public void run() {
while(true) {
try {
sleep(1000);
} catch (Exception e) {
}
save();
}
}
}10. 스레드 그룹
package 스레드그룹;

public class Sample03 {

	public static void main(String[] args) {

		ThreadGroup group = new ThreadGroup("Group1");

		MyThread t1 = new MyThread(group, "first");
		MyThread t2 = new MyThread(group, "second");
		MyThread t3 = new MyThread(group, "third");

		t1.start();
		t2.start();
		t3.start();

		try {
			Thread.sleep(3000);
		} catch(Exception e) {

		}
		group.interrupt();

	}

}
package 스레드그룹;
public class MyThread extends Thread {
MyThread(ThreadGroup group, String name) {
super(group, name);
}
public void run() {
while(true) {
System.out.println(getName());
try {
sleep(500);
} catch(Exception e) {
break;
}
}
System.out.println(getName() + "종료");
}
}★ 사용자랑 컴퓨터랑 전투 (user, aiPc)
기본 데미디 1 ~ 10 난수 설정 .randam()*10)+1
10%확률로 스킬사용( 데미지 30)
체력 둘다 100;
공격 쿨타임 1 ~ 3초 난수 설정 .randam()*3)+1
체력 0이되면 종료
package 게임;

import java.util.Scanner;

public class Main {

	public static void main(String[] args) {

		Scanner sc = new Scanner(System.in);

		String userID;

		System.out.println("유저 아이디 입력 : ");
		userID = sc.next();

		//기존 정보 및 사용할 메서드들이 들어있다.
		Charactor user = new Charactor(userID, 100);
		Charactor com = new Charactor("com", 100);

		PlayerUser playeruser = new PlayerUser(user, com);
		PlayCom playcom = new PlayCom(user, com);

		playeruser.start();
		playcom.start();

	}

}
- class PlayCom
- class PlayerUser
- class Charactor
package 게임;

public class PlayerUser extends Thread {

	//user와 com에 대한 객체 정보를 저장하고 있다

	private Charactor user;
	private Charactor com;

	public PlayerUser(Charactor user, Charactor com) {
		this.user = user;
		this.com = com;
	}

	public void run() {
		int damage;
		int coolTime;

		try {
			while(true) {
				coolTime = ((int)(Math.random() *3) +1 ) * 1000; //공격 쿨타임 랜덤 1~3초 사이로
				Thread.sleep(coolTime);

				if((int)(Math.random()*10) == 4) { //스킬 발송은 10%는 확률로
					user.useSkillMsg();
					com.hp -= 30;
				} else {
					damage = (int)(Math.random() * 10) +1; ////데미지 랜덤 1~10 사이로
					user.attackMsg(damage);
					com.hp -= damage;
				}

				if(com.hp <= 0) { //둘 중에 한명이 체력이 0이 되는 순간
					user.endMsg();
					System.exit(0); // 종료
				}

				System.out.println(com.userID + "의 남은 체력 : " + com.hp);
			}
		} catch(Exception e) {

		}
	}


}
package 게임;
public class PlayCom extends Thread {
private Charactor user;
private Charactor com;
public PlayCom(Charactor user, Charactor com) {
this.user = user;
this.com = com;
}
public void run() {
int damage;
int coolTime;
try {
while(true) {
coolTime = ((int)(Math.random() *3) +1 ) * 1000;
Thread.sleep(coolTime);
if((int)(Math.random()*10) == 4) {
com.useSkillMsg();
user.hp -= 10;
} else {
damage = (int)(Math.random() * 10) +1;
com.attackMsg(damage);
user.hp -= damage;
}
if(user.hp <= 0) {
com.endMsg();
System.exit(0);
}
System.out.println(user.userID + "의 남은 체력 : " + user.hp);
}
} catch(Exception e) {
}
}
}package 게임;
//각 캐릭터 생성 틀
public class Charactor extends User implements Msg {
public Charactor(String userID, int hp) {
this.userID = userID;
this.hp = hp;
}
//인터페이스에서 상속 받은 메서드들을 다 구현 해놓은 것
//메세지 출력
@Override
public void attackMsg(int dmg) {
System.out.println(this.userID + "가 상대에게" + dmg + "의 데미지를 입힙니다.");
}
@Override
public void useSkillMsg() {
System.out.println(this.userID + "가 상대에게 30의 스킬 데미지를 입힙니다.");
}
@Override
public void hpMsg() {
System.out.println("남은 체력 : " + this.hp);
}
@Override
public void endMsg() {
System.out.println(this.userID + " 승리");
}
}package 게임;
//기본 틀
public interface Msg {
//메서드
void attackMsg(int dmg); //공격 시 나타나는 메세지
void useSkillMsg(); //10% 확률로 스킬 사용시 나타나는 메세지
void hpMsg(); //남은 체력 알려주는 메세지
void endMsg(); //종료 시 나타나는 메세지
}package 게임;
//기본 틀
public abstract class User {
String userID;
int hp;
}